Build your own AI Meme Generator & learn how to use OpenAI's function calls ☎️

TL;DR
In this two-part tutorial, we’re going to build a full-stack instant Meme Generator app using:
- React & NodeJS w/ TypeScript
- OpenAI’s Function Calling API
- ImgFlip.com’s meme creator API
You check out a deployed version of the app we’re going to build here: The Memerator
If you just want to see the code for the finished app, check out the Memerator’s GitHub Repo
Before We Begin
We’re working hard at Wasp to help you build web apps as easily as possible — including making these tutorials, which are released weekly!
We would be super grateful if you could help us out by starring our repo on GitHub: https://www.github.com/wasp-lang/wasp 🙏

Intro
Call Me, Maybe
With OpenAI’s chat completions API, developers are now able to do some really cool stuff. It basically enables ChatGPT functionality, but in the form of a callable API you can integrate into any app.
But when working with the API, a lot of devs wanted GPT to give back data in a format, like JSON, that they could use in their app’s functions.
Unfortunately, if you asked ChatGPT to return the data in a certain format, it wouldn’t always get it right. Which is why OpenAI released function calling.
As they describe it, function calling allows devs to “… describe functions to GPT, and have the model intelligently choose to output a JSON object containing arguments to call those functions.”
This is a great way to turn natural language into an API call.
So what better way to learn how to use GPT’s function calling feature than to use it to call Imgflip.com’s meme creator API!?

Let’s Build
In this two-part tutorial, we’re going to build a full-stack React/NodeJS app with:
- Authentication
- Meme generation via OpenAI’s function calling and ImgFlip.com’s API
- Daily cron job to fetch new meme templates
- Meme editing and deleting
- and more!
I already deployed a working version of this app that you can try out here: https://damemerator.netlify.app — so give it a go and let’s get… going.
In Part 1 of this tutorial, we will get the app set up and generating and displaying memes.
In Part 2, we will add more functionality, like recurring cron jobs to fetch more meme templates, and the ability to edit and delete memes.
BTW, two quick tips:
- if you need to reference the app’s finished code at any time to help you with this tutorial, you can check out the app’s GitHub Repo here.
- if you have any questions, feel free to hop into the Wasp Discord Server and ask us!
Part 1
Configuration
We’re going to make this a full-stack React/NodeJS web app so we need to get that set up first. But don’t worry, it won’t take long AT ALL, because we will be using Wasp as the framework.
Wasp does all the heavy lifting for us. You’ll see what I mean in a second.
Set up your Wasp project
First, install Wasp by running this in your terminal:
curl -sSL <https://get.wasp-lang.dev/installer.sh> | sh
Next, let’s clone the start branch of the Memerator app that I’ve prepared for you:
git clone -b start https://github.com/vincanger/memerator.git
Then navigate into the Memerator directory and open up the project in VS Code:
cd Memerator && code .
You’ll notice Wasp sets up your full-stack app with a file structure like so:
.
├── main.wasp             # The wasp config file.
└── src
    ├── client            # Your React client code (JS/CSS/HTML) goes here.
    ├── server            # Your server code (Node JS) goes here.
    └── shared            # Your shared (runtime independent) code goes here.
Let’s check out the main.wasp file first. You can think of it as the “skeleton”, or instructions, of your app. This file configures most of your full-stack app for you 🤯:
app Memerator {
  wasp: {
    version: "^0.11.3"
  },
  title: "Memerator",
  client: {
    rootComponent: import { Layout } from "@client/Layout",
  },
  db: {
    system: PostgreSQL,
    prisma: {
      clientPreviewFeatures: ["extendedWhereUnique"]
    }
  },
  auth: {
    userEntity: User,
    methods: {
      usernameAndPassword: {}
    },
    onAuthFailedRedirectTo: "/login",
    onAuthSucceededRedirectTo: "/"
  },
  dependencies: [
    ("openai", "4.2.0"),
    ("axios", "^1.4.0"),
    ("react-icons", "4.10.1"),
  ]
}

entity User {=psl
    id       Int    @id @default(autoincrement())
    username String @unique
    password String
    memes    Meme[]
    isAdmin  Boolean @default(false)
    credits  Int     @default(2)
psl=}

entity Meme {=psl
    id         String @id @default(uuid())
    url        String
    text0      String
    text1      String
    topics     String
    audience   String
    template   Template @relation(fields: [templateId], references: [id])
    templateId String
    user       User   @relation(fields: [userId], references: [id])
    userId     Int
    createdAt  DateTime @default(now())
psl=}

entity Template {=psl
    id       String @id @unique
    name     String
    url      String
    width    Int
    height   Int
    boxCount Int
    memes    Meme[]
psl=}

route HomePageRoute { path: "/", to: HomePage }
page HomePage {
  component: import { HomePage } from "@client/pages/Home",
}

route LoginRoute { path: "/login", to: LoginPage }
page LoginPage {
  component: import Login from "@client/pages/auth/Login"
}
route SignupRoute { path: "/signup", to: SignupPage }
page SignupPage {
  component: import Signup from "@client/pages/auth/Signup"
}
As you can see, our main.wasp config file has our:
- dependencies,
- authentication method,
- database type, and
- database models (”entities”)
- client-side pages & routes
You might have also noticed this {=psl psl=} syntax in the entities above. This denotes that anything in between these psl brackets is actually a different language, in this case, Prisma Schema Language. Wasp uses Prisma under the hood, so if you've used Prisma before, it should be straightforward.
Also, make sure you install the Wasp VS code extension so that you get nice syntax highlighting and the best overall dev experience.
Setting up the Database
We still need to get a Postgres database setup.
Usually this can be pretty annoying, but with Wasp it’s really easy.
- just have Docker Deskop installed and running,
- open up a separate terminal tab/window,
cdinto theMemeratordirectory, and then run
wasp start db
This will start and connect your app to a Postgres database for you. No need to do anything else! 🤯
Just leave this terminal tab, along with docker desktop, open and running in the background.
Now, in a different terminal tab, run
wasp db migrate-dev
and make sure to give your database migration a name, like init.
Environment Variables
In the root of your project, you’ll find a .env.server.example file that looks like this:
# set up your own credentials on https://imgflip.com/signup and rename this file to .env.server
# NOTE: make sure you register with Username and Password (not google)
IMGFLIP_USERNAME=
IMGFLIP_PASSWORD=

# get your api key from https://platform.openai.com/
OPENAI_API_KEY=

JWT_SECRET=asecretphraseatleastthirtytwocharacterslong
Rename this file to .env.server and follow the instructions in it to get your:
as we will need them to generate our memes 🤡
Start your App
With everything setup correctly, you should now be able to run
wasp start
When running wasp start, Wasp will install all the necessary npm packages, start our NodeJS server on port 3001, and our React client on port 3000.
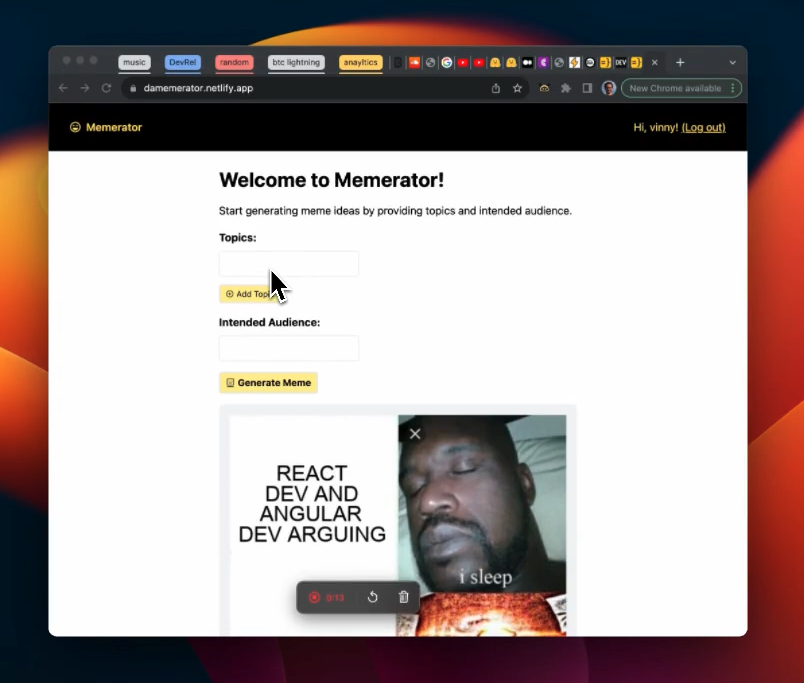
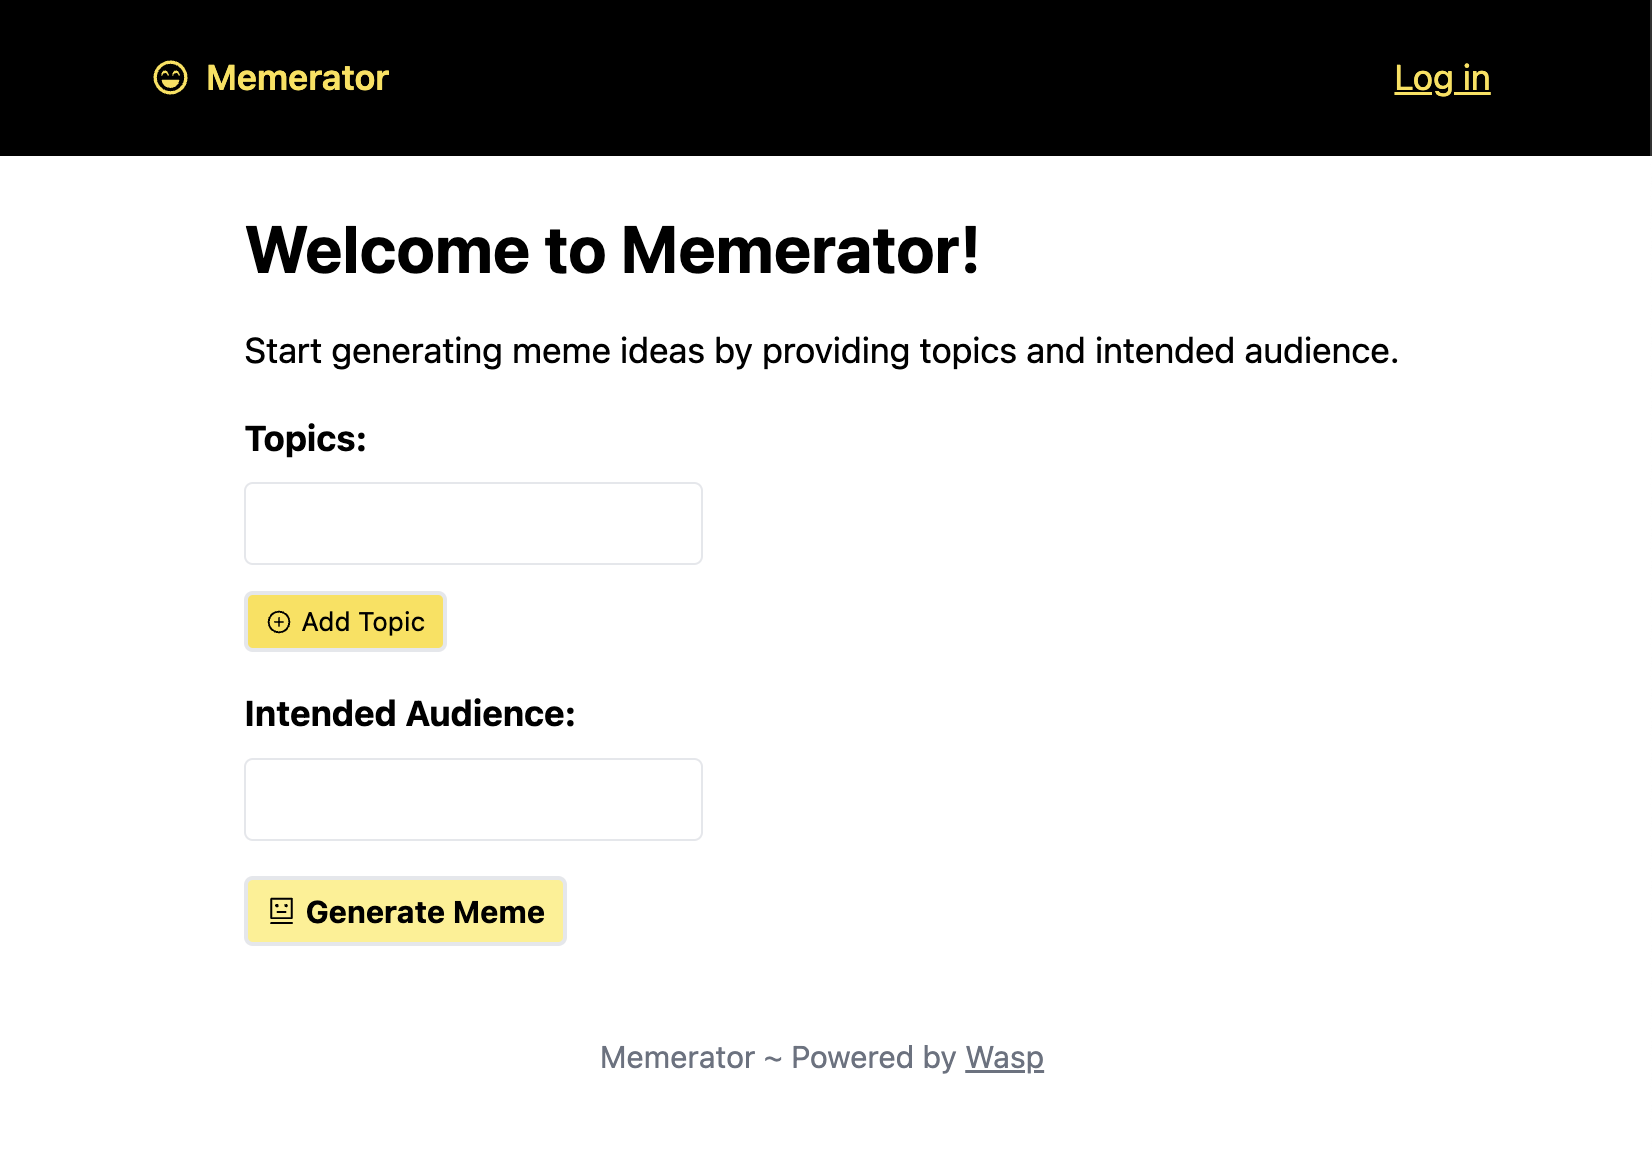
Head to localhost:3000 in your browser to check it out. We should have the basis for our app that looks like this:
Generating a Meme
The boilerplate code already has the client-side form set up for generating memes based on:
- topics
- intended audience
This is the info we will send to the backend to call the OpenAI API using function calls. We then send this info to the imglfip.com API to generate the meme.
But the /caption_image endpoint of the imgflip API needs the meme template id. And to get that ID we first need to fetch the available meme templates from imgflip’s /get_memes endpoint
Server-Side Code
Create a new file in src/server/ called utils.ts:
import axios from 'axios';
import { stringify } from 'querystring';
import HttpError from '@wasp/core/HttpError.js';

type GenerateMemeArgs = {
  text0: string;
  text1: string;
  templateId: string;
};

export const fetchMemeTemplates = async () => {
  try {
    const response = await axios.get('https://api.imgflip.com/get_memes');
    return response.data.data.memes;
  } catch (error) {
    console.error(error);
    throw new HttpError(500, 'Error fetching meme templates');
  }
};

export const generateMemeImage = async (args: GenerateMemeArgs) => {
  console.log('args: ', args);

  try {
    const data = stringify({
      template_id: args.templateId,
      username: process.env.IMGFLIP_USERNAME,
      password: process.env.IMGFLIP_PASSWORD,
      text0: args.text0,
      text1: args.text1,
    });

    // Implement the generation of meme using the Imgflip API
    const res = await axios.post('https://api.imgflip.com/caption_image', data, {
      headers: {
        'Content-Type': 'application/x-www-form-urlencoded',
      },
    });

    const url = res.data.data.url;

    console.log('generated meme url: ', url);

    return url as string;
  } catch (error) {
    console.error(error);
    throw new HttpError(500, 'Error generating meme image');
  }
};
This gives us some utility functions to help us fetch all the meme templates that we can possibly generate meme images with.
Notice that the POST request to the /caption_image endpoint takes the following data:
- our imgflip username and password
- ID of the meme template we will use
- the text for top of the meme, i.e. text0
- the text for the bottom of the meme, i.e. text1

The text0 and text1 arguments will generated for us by our lovely friend, ChatGPT. But in order for GPT to do that, we have to set up its API call, too.
To do that, create a new file in src/server/ called actions.ts.
Then go back to your main.wasp config file and add the following Wasp Action at the bottom of the file:
//...

action createMeme {
  fn: import { createMeme } from "@server/actions.js",
  entities: [Meme, Template, User]
}
An Action is a type of Wasp Operation that changes some state on the backend. It’s essentially a NodeJS function that gets called on the server, but Wasp takes care of setting it all up for you.
This means you don't have to worry about building an HTTP API for the Action, managing server-side request handling, or even dealing with client-side response handling and caching. Instead, you just write the business logic!

If you’ve got the Wasp VS Code extension installed, you’ll see an error (above). Hover over it and click Quick Fix > create function createMeme.
This will scaffold a createMeme function (below) for you in your actions.ts file if the file exists. Pretty Cool!
import { CreateMeme } from '@wasp/actions/types'

type CreateMemeInput = void
type CreateMemeOutput = void

export const createMeme: CreateMeme<CreateMemeInput, CreateMemeOutput> = async (args, context) => {
  // Implementation goes here
}
You can see that it imports the Action types for you as well.
Because we will be sending the topics array and the intended audience string for the meme from our front-end form, and in the end we will return the newly created Meme entity, that’s what we should define our types as.
Remember, the Meme entity is the database model we defined in our main.wasp config file.
Knowing that, we can change the content of actions.ts to this:
import type { CreateMeme } from '@wasp/actions/types'
import type { Meme } from '@wasp/entities';

type CreateMemeArgs = { topics: string[]; audience: string };

export const createMeme: CreateMeme<CreateMemeArgs, Meme> = async ({ topics, audience }, context) => {
  // Implementation goes here
}
Before we implement the rest of the logic, let’s run through how our createMeme function should work and how our Meme will get generated:
- fetch the imgflip meme template we want to use
- send its name, the topics, and intended audience to OpenAI’s chat completions API
- tell OpenAI we want the result back as arguments we can pass to our next function in JSON format, i.e. OpenAI’s function calling
- pass those arguments to the imgflip /caption-image endpoint and get our created meme’s url
- save the meme url and other info into our DB as a
Memeentity
With all that in mind, go ahead and entirely replace the content in our actions.ts with the completed createMeme action:
import HttpError from '@wasp/core/HttpError.js';
import OpenAI from 'openai';
import { fetchMemeTemplates, generateMemeImage } from './utils.js';

import type { CreateMeme } from '@wasp/actions/types';
import type { Meme, Template } from '@wasp/entities';

type CreateMemeArgs = { topics: string[]; audience: string };

const openai = new OpenAI({
  apiKey: process.env.OPENAI_API_KEY,
});

export const createMeme: CreateMeme<CreateMemeArgs, Meme> = async ({ topics, audience }, context) => {
  if (!context.user) {
    throw new HttpError(401, 'You must be logged in');
  }

  if (context.user.credits === 0 && !context.user.isAdmin) {
    throw new HttpError(403, 'You have no credits left');
  }

  const topicsStr = topics.join(', ');

  let templates: Template[] = await context.entities.Template.findMany({});

    if (templates.length === 0) {
    const memeTemplates = await fetchMemeTemplates();
    templates = await Promise.all(
      memeTemplates.map(async (template: any) => {
        const addedTemplate = await context.entities.Template.upsert({
          where: { id: template.id },
          create: {
            id: template.id,
            name: template.name,
            url: template.url,
            width: template.width,
            height: template.height,
            boxCount: template.box_count
          },
          update: {}
        });

        return addedTemplate;
      })
    );
  }

  // filter out templates with box_count > 2
  templates = templates.filter((template) => template.boxCount <= 2);
  const randomTemplate = templates[Math.floor(Math.random() * templates.length)];

  console.log('random template: ', randomTemplate);

  const sysPrompt = `You are a meme idea generator. You will use the imgflip api to generate a meme based on an idea you suggest. Given a random template name and topics, generate a meme idea for the intended audience. Only use the template provided`;
  const userPrompt = `Topics: ${topicsStr} \n Intended Audience: ${audience} \n Template: ${randomTemplate.name} \n`;

  let openAIResponse: OpenAI.Chat.Completions.ChatCompletion;
  try {
    openAIResponse = await openai.chat.completions.create({
      messages: [
        { role: 'system', content: sysPrompt },
        { role: 'user', content: userPrompt },
      ],
      functions: [
        {
          name: 'generateMemeImage',
          description: 'Generate meme via the imgflip API based on the given idea',
          parameters: {
            type: 'object',
            properties: {
              text0: { type: 'string', description: 'The text for the top caption of the meme' },
              text1: { type: 'string', description: 'The text for the bottom caption of the meme' },
            },
            required: ['templateName', 'text0', 'text1'],
          },
        },
      ],
      function_call: {
        name: 'generateMemeImage',
      },
      model: 'gpt-4-0613',
    });
  } catch (error: any) {
    console.error('Error calling openAI: ', error);
    throw new HttpError(500, 'Error calling openAI');
  }

  console.log(openAIResponse.choices[0]);

  /**
   * the Function call returned by openAI looks like this:
   */
  // {
  //   index: 0,
  //   message: {
  //     role: 'assistant',
  //     content: null,
  //     function_call: {
  //       name: 'generateMeme',
  //       arguments: '{\n' +
  //         `  "text0": "CSS you've been writing all day",\n` +
  //         '  "text1": "This looks horrible"\n' +
  //         '}'
  //     }
  //   },
  //   finish_reason: 'stop'
  // }
  if (!openAIResponse.choices[0].message.function_call) throw new HttpError(500, 'No function call in openAI response');

  const gptArgs = JSON.parse(openAIResponse.choices[0].message.function_call.arguments);
  console.log('gptArgs: ', gptArgs);

  const memeIdeaText0 = gptArgs.text0;
  const memeIdeaText1 = gptArgs.text1;

  console.log('meme Idea args: ', memeIdeaText0, memeIdeaText1);

  const memeUrl = await generateMemeImage({
    templateId: randomTemplate.id,
    text0: memeIdeaText0,
    text1: memeIdeaText1,
  });

  const newMeme = await context.entities.Meme.create({
    data: {
      text0: memeIdeaText0,
      text1: memeIdeaText1,
      topics: topicsStr,
      audience: audience,
      url: memeUrl,
      template: { connect: { id: randomTemplate.id } },
      user: { connect: { id: context.user.id } },
    },
  });

  return newMeme;
};
At this point, the code above should be pretty self-explanatory, but I want to highlight a couple points:
- the
contextobject is passed through to all Actions and Queries by Wasp. It contains the Prisma client with access to the DB entities you defined in yourmain.waspconfig file. - We first look for the imgflip meme templates in our DB. If none are found, we fetch them using our
fetchTemplatesutility function we defined earlier. Then weupsertthem into our DB. - There are some meme templates that take more than 2 text boxes, but for this tutorial we’re only using meme templates with 2 text inputs to make it easier.
- We choose a random template from this list to use as a basis for our meme (it’s actually a great way to serendipitously generate some interesting meme content).
- We give the OpenAI API info about the functions it can create arguments for via the
functionsandfunction_callproperties, which tell it to always return JSON arguments for our function,generateMemeImage
Great! But once we start generating memes, we will need a way to display them on our front end.
So let’s now create a Wasp Query. A Query works just like an Action, except it’s only for reading data.
Go to src/server and create a new file called queries.ts.
Next, in your main.wasp file add the following code:
//...

query getAllMemes {
  fn: import { getAllMemes } from "@server/queries.js",
  entities: [Meme]
}
Then in your queries.ts file, add the getAllMemes function:
import HttpError from '@wasp/core/HttpError.js';

import type { Meme } from '@wasp/entities';
import type { GetAllMemes } from '@wasp/queries/types';

export const getAllMemes: GetAllMemes<void, Meme[]> = async (_args, context) => {
  const memeIdeas = await context.entities.Meme.findMany({
    orderBy: { createdAt: 'desc' },
    include: { template: true },
  });

  return memeIdeas;
};
Client-Side Code
Now that we’ve got the createMeme and getAllMemes code implemented server-side, let’s hook it up to our client.
Wasp makes it really easy to import the Operations we just created and call them on our front end.
You can do so by going to src/client/pages/Home.tsx and adding the following code to the top of the file:
//...other imports...
import { useQuery } from '@wasp/queries';
import createMeme from '@wasp/actions/createMeme';
import getAllMemes from '@wasp/queries/getAllMemes';
import useAuth from '@wasp/auth/useAuth';

export function HomePage() {
  const [topics, setTopics] = useState(['']);
  const [audience, setAudience] = useState('');
  const [isMemeGenerating, setIsMemeGenerating] = useState(false);

  // 😎 😎 😎
  const { data: user } = useAuth();
  const { data: memes, isLoading, error } = useQuery(getAllMemes);

  const handleGenerateMeme: FormEventHandler<HTMLFormElement> = async (e) => {
    e.preventDefault();
    if (!user) {
      history.push('/login');
      return;
    }
    if (topics.join('').trim().length === 0 || audience.length === 0) {
      alert('Please provide topic and audience');
      return;
    }
    try {
      setIsMemeGenerating(true);
      await createMeme({ topics, audience }); // <--- 😎 😎 😎
    } catch (error: any) {
      alert('Error generating meme: ' + error.message);
    } finally {
      setIsMemeGenerating(false);
    }
  };

//...
As you can see, we’ve imported createMeme and getAllMemes (😎).
For getAllMemes, we wrap it in the useQuery hook so that we can fetch and cache the data. On the other hand, our createMeme Action gets called in handleGenerateMeme which we will call when submit our form.
Rather than adding code to the Home.tsx file piece-by-piece, here is the file with all the code to generate and display the memes. Go ahead and replace all of Home.tsx with this code and I’ll explain it in more detail below:
import { useState, FormEventHandler } from 'react';
import { useQuery } from '@wasp/queries';
import createMeme from '@wasp/actions/createMeme';
import getAllMemes from '@wasp/queries/getAllMemes';
import useAuth from '@wasp/auth/useAuth';
import { useHistory } from 'react-router-dom';
import {
  AiOutlinePlusCircle,
  AiOutlineMinusCircle,
  AiOutlineRobot,
} from 'react-icons/ai';

export function HomePage() {
  const [topics, setTopics] = useState(['']);
  const [audience, setAudience] = useState('');
  const [isMemeGenerating, setIsMemeGenerating] = useState(false);

  const history = useHistory();
  const { data: user } = useAuth();
  const { data: memes, isLoading, error } = useQuery(getAllMemes);

  const handleGenerateMeme: FormEventHandler<HTMLFormElement> = async (e) => {
    e.preventDefault();
    if (!user) {
      history.push('/login');
      return;
    }
    if (topics.join('').trim().length === 0 || audience.length === 0) {
      alert('Please provide topic and audience');
      return;
    }
    try {
      setIsMemeGenerating(true);
      await createMeme({ topics, audience });
    } catch (error: any) {
      alert('Error generating meme: ' + error.message);
    } finally {
      setIsMemeGenerating(false);
    }
  };

  const handleDeleteMeme = async (id: string) => {
    //...
  };

  if (isLoading) return 'Loading...';
  if (error) return 'Error: ' + error;

  return (
    <div className='p-4'>
      <h1 className='text-3xl font-bold mb-4'>Welcome to Memerator!</h1>
      <p className='mb-4'>Start generating meme ideas by providing topics and intended audience.</p>
      <form onSubmit={handleGenerateMeme}>
        <div className='mb-4 max-w-[500px]'>
          <label htmlFor='topics' className='block font-bold mb-2'>
            Topics:
          </label>
          {topics.map((topic, index) => (
            <input
              key={index}
              type='text'
              id='topics'
              value={topic}
              onChange={(e) => {
                const updatedTopics = [...topics];
                updatedTopics[index] = e.target.value;
                setTopics(updatedTopics);
              }}
              className='p-1 mr-1 mb-1 border rounded text-lg focus:outline-none focus:ring-2 focus:ring-primary-600 focus:border-transparent'
            />
          ))}
          <div className='flex items-center my-2 gap-1'>
            <button
              type='button'
              onClick={() => topics.length < 3 && setTopics([...topics, ''])}
              className='flex items-center gap-1 bg-primary-200 hover:bg-primary-300 border-2 text-black text-xs py-1 px-2 rounded'
            >
              <AiOutlinePlusCircle /> Add Topic
            </button>
            {topics.length > 1 && (
              <button
                onClick={() => setTopics(topics.slice(0, -1))}
                className='flex items-center gap-1 bg-red-500 hover:bg-red-700 border-2 text-white text-xs py-1 px-2 rounded'
              >
                <AiOutlineMinusCircle /> Remove Topic
              </button>
            )}
          </div>
        </div>
        <div className='mb-4'>
          <label htmlFor='audience' className='block font-bold mb-2'>
            Intended Audience:
          </label>
          <input
            type='text'
            id='audience'
            value={audience}
            onChange={(e) => setAudience(e.target.value)}
            className='p-1 border rounded text-lg focus:outline-none focus:ring-2 focus:ring-primary-600 focus:border-transparent'
          />
        </div>
        <button
          type='submit'
          className={`flex items-center gap-1 bg-primary-200 hover:bg-primary-300 border-2 text-black text-sm font-bold py-1 px-2 rounded ${
            isMemeGenerating ? 'opacity-50 cursor-not-allowed' : 'cursor-pointer'
          } $}`}
        >
          <AiOutlineRobot />
          {!isMemeGenerating ? 'Generate Meme' : 'Generating...'}
        </button>
      </form>

      {!!memes && memes.length > 0 ? (
        memes.map((memeIdea) => (
          <div key={memeIdea.id} className='mt-4 p-4 bg-gray-100 rounded-lg'>
            <img src={memeIdea.url} width='500px' />
            <div className='flex flex-col items-start mt-2'>
              <div>
                <span className='text-sm text-gray-700'>Topics: </span>
                <span className='text-sm italic text-gray-500'>{memeIdea.topics}</span>
              </div>
              <div>
                <span className='text-sm text-gray-700'>Audience: </span>
                <span className='text-sm italic text-gray-500'>{memeIdea.audience}</span>
              </div>
            </div>
            {/* TODO: implement edit and delete meme features */}
          </div>
        ))
      ) : (
        <div className='flex justify-center mt-5'> :( no memes found</div>
      )}
    </div>
  );
}
There are two things I want to point out about this code:
- The
useQueryhook calls ourgetAllMemesQuery when the component mounts. It also caches the result for us, as well as automatically re-fetching whenever we add a new Meme to our DB viacreateMeme. This means our page will reload automatically whenever a new meme is generated. - The
useAuthhook allows us to fetch info about our logged in user. If the user isn’t logged in, we force them to do so before they can generate a meme.
These are really cool Wasp features that make your life as a developer a lot easier 🙂
So go ahead now and try and generate a meme. Here’s the one I just generated:
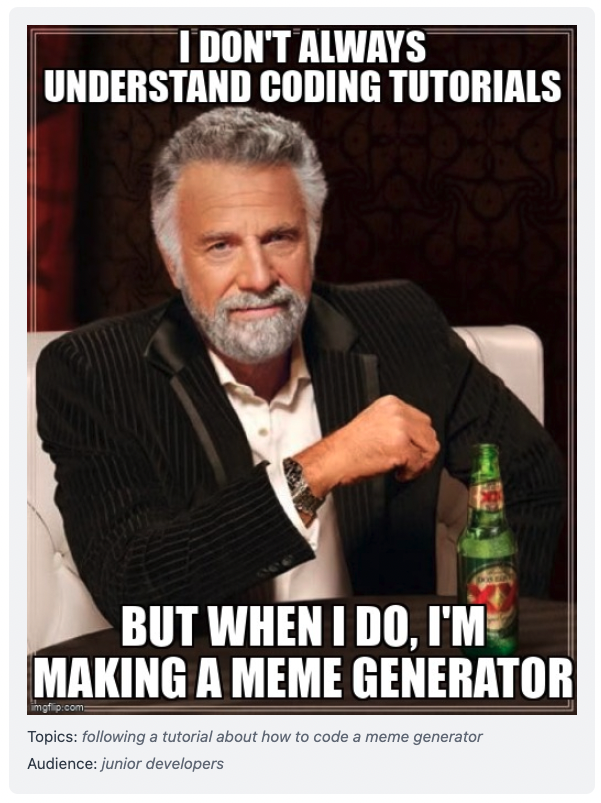
Haha. Pretty good!
Now wouldn’t it be cool though if we could edit and delete our memes? And what if we could expand the set of meme templates for our generator to use? Wouldn’t that be cool, too?
Yes, it would be. So let’s do that.
To Be Continued…
In Part 2 of this tutorial, we’ll take care of the rest of the app, like adding recurring cron jobs to fetch more meme templates, and the ability to edit, delete, and share memes.
If you found this useful so far, please show us your support by giving us a star on GitHub! It will help us continue to make more stuff just like it.